
How to Propagate Plump Haworthia Cooperi Succulent at Home
Succulents have gained immense popularity due to their unique appearance, easy care, and ability to thrive in various environments. Among the many types, the plump Haworthia Cooperi succulent stands out with its striking, transparent leaves and compact growth habit. Propagating this succulent at home is not only a rewarding experience but also a cost-effective way to expand your collection. In this comprehensive guide, we will walk you through the process of propagating the plump Haworthia Cooperi succulent, ensuring that you can achieve successful results.
Understanding the Plump Haworthia Cooperi Succulent
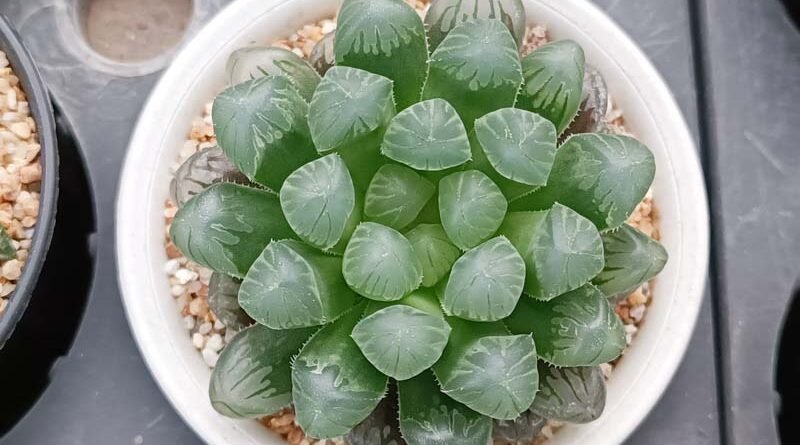
The Haworthia Cooperi is a small, rosette-forming succulent native to South Africa. It is known for its fleshy, translucent leaves that often appear swollen, giving it the “plump” appearance. The plant is relatively easy to care for and can thrive indoors, making it a favorite among succulent enthusiasts. Before diving into propagation, it’s important to understand the plant’s characteristics and growth requirements.
Key Characteristics:
- Translucent Leaves: The leaves of Haworthia Cooperi are unique in that they allow light to pass through, which is a trait not commonly found in other succulents.
- Slow Growth: This succulent grows slowly, making it an ideal candidate for indoor cultivation.
- Low Maintenance: It requires minimal watering and can tolerate low light conditions, although it thrives best in bright, indirect light.
Why Propagate Haworthia Cooperi?
Propagating the plump Haworthia Cooperi succulent offers several benefits:
- Cost-Effective: Instead of purchasing new plants, you can propagate your existing ones.
- Plant Sharing: Propagation allows you to share your beloved succulent with friends and family.
- Succulent Arrangement: Create lush arrangements by combining multiple propagated plants.
Methods of Propagation
There are several methods you can use to propagate the plump Haworthia Cooperi succulent. Each method has its advantages, and the choice may depend on your experience level and preference.
1. Offset Division
Offset division is the most common and straightforward method of propagating Haworthia Cooperi. Offsets, also known as pups, are small clones that grow from the base of the mother plant.
Steps to Propagate Using Offset Division:
- Identify the Offsets: Look for small, plump offsets growing around the base of the mother plant. These should be at least 1/3 the size of the parent plant before removal.
- Remove the Offsets: Gently remove the plant from its pot and carefully separate the offsets using a sterilized knife or by twisting them off by hand. Ensure that each offset has its own set of roots.
- Prepare for Planting: Allow the offsets to dry for a day or two to let the cut surfaces callous over. This step reduces the risk of rot when the offsets are planted.
- Plant the Offsets: Place the offsets in well-draining succulent soil. Water lightly after planting and place them in a bright, indirect light location.
- Care for the New Plants: Water the offsets sparingly, only when the soil is completely dry. Over time, the offsets will establish themselves and start growing into full-sized plants.
2. Leaf Cuttings
Another popular method of propagating Haworthia Cooperi is through leaf cuttings. This method requires more patience but can be rewarding when done correctly.
Steps to Propagate Using Leaf Cuttings:
- Choose a Healthy Leaf: Select a plump, healthy leaf from the lower part of the plant. It’s crucial to choose a mature leaf, as younger leaves may not have enough stored energy to propagate.
- Remove the Leaf: Gently twist the leaf off from the base, ensuring that the entire leaf is removed without tearing. A clean removal increases the chances of successful propagation.
- Allow the Leaf to Callous: Place the leaf in a dry, shaded area for several days until the cut end callouses over. This process prevents the leaf from rotting when placed in soil.
- Plant the Leaf: Once calloused, lay the leaf flat on top of well-draining succulent soil or lightly bury the cut end in the soil.
- Water Sparingly: Mist the soil lightly to provide moisture. Keep the soil slightly damp but not wet, as too much water can lead to rot.
- Wait for Roots and Pups: Over the next few weeks, roots will begin to form from the cut end of the leaf. Eventually, small pups will start to grow at the base, which can later be separated and planted individually.
3. Seed Propagation
Seed propagation is the least common method due to its lengthy process, but it’s an option for those looking to grow Haworthia Cooperi from scratch.
Steps to Propagate Using Seeds:
- Obtain Fresh Seeds: Purchase seeds from a reputable supplier or collect them from your plant after flowering.
- Prepare the Soil: Use a well-draining succulent mix and lightly moisten it before planting the seeds.
- Sow the Seeds: Sprinkle the seeds on the soil surface and lightly press them down. Do not cover the seeds with soil, as they need light to germinate.
- Provide the Right Environment: Place the seed tray in a warm, bright location with indirect light. Maintain consistent moisture levels by misting the soil regularly.
- Wait for Germination: Seed germination can take several weeks to months. Once the seedlings are large enough to handle, they can be transplanted into individual pots.
Aftercare for Newly Propagated Succulents
Once you’ve successfully propagated your plump Haworthia Cooperi succulent, the aftercare is crucial to ensure their growth and health. Follow these guidelines to keep your new plants thriving:
1. Light Requirements
Place your propagated succulents in a location with bright, indirect light. Direct sunlight can scorch the delicate leaves, while too little light can cause leggy growth.
2. Watering Schedule
Haworthia Cooperi is susceptible to overwatering, so it’s important to let the soil dry out completely between waterings. Water your succulents every 2-3 weeks, adjusting based on the season and climate.
3. Soil and Potting
Use a well-draining succulent mix to prevent root rot. Terra cotta pots are ideal as they allow excess moisture to evaporate, keeping the roots dry and healthy.
4. Temperature and Humidity
Haworthia Cooperi prefers temperatures between 60-80°F (16-27°C) and can tolerate low humidity levels. Protect your plants from frost and extreme heat, which can be detrimental to their growth.
5. Fertilizing
During the growing season (spring and summer), feed your succulents with a balanced, diluted fertilizer every 4-6 weeks. Avoid fertilizing in the winter when the plant is dormant.
Common Issues and Troubleshooting
Even with the best care, you may encounter some common issues when propagating Haworthia Cooperi. Here’s how to address them:
1. Root Rot
Root rot is usually caused by overwatering or poorly draining soil. To prevent this, ensure that your soil mix is well-draining and that you allow it to dry out between waterings.
2. Leaf Shriveling
If the leaves of your Haworthia Cooperi start to shrivel, it may be due to underwatering or too much direct sunlight. Adjust your watering schedule and move the plant to a location with filtered light.
3. Pest Infestation
Mealybugs and spider mites are common pests that can affect succulents. Inspect your plants regularly and treat any infestations with insecticidal soap or neem oil.
Conclusion
Propagating the plump Haworthia Cooperi succulent at home is a rewarding experience that allows you to expand your collection and share this beautiful plant with others. Whether you choose to propagate through offset division, leaf cuttings, or seeds, following the proper steps and aftercare will ensure successful growth. With a little patience and attention, you’ll soon have a thriving collection of Haworthia Cooperi succulents to enjoy for years to come.
4o
Succulents have gained immense popularity due to their unique appearance, easy care, and ability to thrive in various environments. Among the many types, the plump Haworthia Cooperi succulent stands out with its striking, transparent leaves and compact growth habit. Propagating this succulent at home is not only a rewarding experience but also a cost-effective way to expand your collection. In this comprehensive guide, we will walk you through the process of propagating the plump Haworthia Cooperi succulent, ensuring that you can achieve successful results.
Understanding the Plump Haworthia Cooperi Succulent
The Haworthia Cooperi is a small, rosette-forming succulent native to South Africa. It is known for its fleshy, translucent leaves that often appear swollen, giving it the “plump” appearance. The plant is relatively easy to care for and can thrive indoors, making it a favorite among succulent enthusiasts. Before diving into propagation, it’s important to understand the plant’s characteristics and growth requirements.
Key Characteristics:
- Translucent Leaves: The leaves of Haworthia Cooperi are unique in that they allow light to pass through, which is a trait not commonly found in other succulents.
- Slow Growth: This succulent grows slowly, making it an ideal candidate for indoor cultivation.
- Low Maintenance: It requires minimal watering and can tolerate low light conditions, although it thrives best in bright, indirect light.
Why Propagate Haworthia Cooperi?
Propagating the plump Haworthia Cooperi succulent offers several benefits:
- Cost-Effective: Instead of purchasing new plants, you can propagate your existing ones.
- Plant Sharing: Propagation allows you to share your beloved succulent with friends and family.
- Succulent Arrangement: Create lush arrangements by combining multiple propagated plants.
Methods of Propagation
There are several methods you can use to propagate the plump Haworthia Cooperi succulent. Each method has its advantages, and the choice may depend on your experience level and preference.
1. Offset Division
Offset division is the most common and straightforward method of propagating Haworthia Cooperi. Offsets, also known as pups, are small clones that grow from the base of the mother plant.
Steps to Propagate Using Offset Division:
- Identify the Offsets: Look for small, plump offsets growing around the base of the mother plant. These should be at least 1/3 the size of the parent plant before removal.
- Remove the Offsets: Gently remove the plant from its pot and carefully separate the offsets using a sterilized knife or by twisting them off by hand. Ensure that each offset has its own set of roots.
- Prepare for Planting: Allow the offsets to dry for a day or two to let the cut surfaces callous over. This step reduces the risk of rot when the offsets are planted.
- Plant the Offsets: Place the offsets in well-draining succulent soil. Water lightly after planting and place them in a bright, indirect light location.
- Care for the New Plants: Water the offsets sparingly, only when the soil is completely dry. Over time, the offsets will establish themselves and start growing into full-sized plants.
2. Leaf Cuttings
Another popular method of propagating Haworthia Cooperi is through leaf cuttings. This method requires more patience but can be rewarding when done correctly.
Steps to Propagate Using Leaf Cuttings:
- Choose a Healthy Leaf: Select a plump, healthy leaf from the lower part of the plant. It’s crucial to choose a mature leaf, as younger leaves may not have enough stored energy to propagate.
- Remove the Leaf: Gently twist the leaf off from the base, ensuring that the entire leaf is removed without tearing. A clean removal increases the chances of successful propagation.
- Allow the Leaf to Callous: Place the leaf in a dry, shaded area for several days until the cut end callouses over. This process prevents the leaf from rotting when placed in soil.
- Plant the Leaf: Once calloused, lay the leaf flat on top of well-draining succulent soil or lightly bury the cut end in the soil.
- Water Sparingly: Mist the soil lightly to provide moisture. Keep the soil slightly damp but not wet, as too much water can lead to rot.
- Wait for Roots and Pups: Over the next few weeks, roots will begin to form from the cut end of the leaf. Eventually, small pups will start to grow at the base, which can later be separated and planted individually.
3. Seed Propagation
Seed propagation is the least common method due to its lengthy process, but it’s an option for those looking to grow Haworthia Cooperi from scratch.
Steps to Propagate Using Seeds:
- Obtain Fresh Seeds: Purchase seeds from a reputable supplier or collect them from your plant after flowering.
- Prepare the Soil: Use a well-draining succulent mix and lightly moisten it before planting the seeds.
- Sow the Seeds: Sprinkle the seeds on the soil surface and lightly press them down. Do not cover the seeds with soil, as they need light to germinate.
- Provide the Right Environment: Place the seed tray in a warm, bright location with indirect light. Maintain consistent moisture levels by misting the soil regularly.
- Wait for Germination: Seed germination can take several weeks to months. Once the seedlings are large enough to handle, they can be transplanted into individual pots.
Aftercare for Newly Propagated Succulents
Once you’ve successfully propagated your plump Haworthia Cooperi succulent, the aftercare is crucial to ensure their growth and health. Follow these guidelines to keep your new plants thriving:
1. Light Requirements
Place your propagated succulents in a location with bright, indirect light. Direct sunlight can scorch the delicate leaves, while too little light can cause leggy growth.
2. Watering Schedule
Haworthia Cooperi is susceptible to overwatering, so it’s important to let the soil dry out completely between waterings. Water your succulents every 2-3 weeks, adjusting based on the season and climate.
3. Soil and Potting
Use a well-draining succulent mix to prevent root rot. Terra cotta pots are ideal as they allow excess moisture to evaporate, keeping the roots dry and healthy.
4. Temperature and Humidity
Haworthia Cooperi prefers temperatures between 60-80°F (16-27°C) and can tolerate low humidity levels. Protect your plants from frost and extreme heat, which can be detrimental to their growth.
5. Fertilizing
During the growing season (spring and summer), feed your succulents with a balanced, diluted fertilizer every 4-6 weeks. Avoid fertilizing in the winter when the plant is dormant.
Common Issues and Troubleshooting
Even with the best care, you may encounter some common issues when propagating Haworthia Cooperi. Here’s how to address them:
1. Root Rot
Root rot is usually caused by overwatering or poorly draining soil. To prevent this, ensure that your soil mix is well-draining and that you allow it to dry out between waterings.
2. Leaf Shriveling
If the leaves of your Haworthia Cooperi start to shrivel, it may be due to underwatering or too much direct sunlight. Adjust your watering schedule and move the plant to a location with filtered light.
3. Pest Infestation
Mealybugs and spider mites are common pests that can affect succulents. Inspect your plants regularly and treat any infestations with insecticidal soap or neem oil. Also Read
Conclusion
Propagating the plump Haworthia Cooperi succulent at home is a rewarding experience that allows you to expand your collection and share this beautiful plant with others. Whether you choose to propagate through offset division, leaf cuttings, or seeds, following the proper steps and aftercare will ensure successful growth. With a little patience and attention, you’ll soon have a thriving collection of Haworthia Cooperi succulents to enjoy for years to come.